
Consent Management
Consent management records who has agreed to receive RCS messages from each of your agents, and who has stopped. Both features of the app depend on it: workflows message only opted-in contacts, and an inbox conversation opens only for an opted-in contact. This page explains what the consent steps of the setup guide do and how consent is stored. The record lives on the HubSpot contact, so your CRM stays the source of truth.
Access
You do not need an RCS Studio account to record or withdraw consent, or to read or edit the consent properties in HubSpot. Opting people in and out from an agent's Consent tab needs the manual consent switch, and the API integration needs the API consent switch. Both are off by default, so only a HubSpot super admin can use them until a super admin turns them on (Manage your team in HubSpot). The Consent tab appears to people who may use at least one of them, or who have See links (for the JOIN link).
How consent works
Consent is per agent. A contact can be opted in to one agent and opted out of another.
- Opted in means the contact agreed to messages from this agent. Only opted-in contacts receive workflow messages.
- Opted out means the contact asked to stop. The app records it even if the contact was never opted in. For each agent, a contact is in only one of the two states at a time.
- Double opt-in is an optional confirmation message that the contact must answer before the opt-in counts. It is configured in the setup guide and described on Collect future consent.
- Consent comes from RCS Studio flows. From a contact's texts, only the system flows that RCS Studio runs for your agent record consent. The app infers nothing from a message that no flow handled.
- The app does not check where consent came from. It records what you or your contacts tell it. Carrier rules and the law decide what counts as valid consent, and RCS Studio's launch page covers the carrier compliance review.
Where consent is stored and shown
Every opt-in and opt-out is written to two contact properties. That always happens. Two optional extras show it to your team: the opt-in list and the RCS Consent card.
| Where | What it is | Required |
|---|---|---|
| Two contact properties | The record itself, on every contact | Always on |
| The opt-in list | A HubSpot contact list the app keeps up to date | Optional |
| The RCS Consent card | A read-only card on the contact record | Optional |
| The contact timeline | A Consent granted or Consent revoked entry for each change | Always on |
Contact properties
The app creates two custom contact properties the first time an agent is set up:
| Property | Holds |
|---|---|
RCS Consent — Opted In (rcs_consent_opted_in) | The agents the contact has opted in to, one checkbox per agent, shown by agent name |
RCS Consent — Opted Out (rcs_consent_opted_out) | The agents the contact has explicitly opted out of |
They sit in the RCS Studio property group. An agent is in one property at a time: opting in removes it from Opted Out, and opting out removes it from Opted In. The checkbox label follows the agent's name, so renaming the agent renames it. If two agents have the same name, the later one's label gets the last six characters of its agent id, for example Support (a1b2c3).
You can use the properties in workflow filters, list criteria and segments:
- RCS Consent — Opted In is any of your agent builds a segment of consented contacts.
- RCS Consent — Opted Out is any of your agent builds a suppression filter.
Choose how you see consent
Neither the opt-in list nor the card is required. With neither, you still have the contact properties and the timeline, and Add your existing consent still works. A new agent starts this way. The Opt-Out Capture and Opt-In Capture steps of the setup guide show Not set up with "Turn on the opt-in list or add the RCS Consent card" until you choose one. Nothing is blocked.
The options are only about how your team sees consent. You can use either, both or neither. Set them in the How you'll see consent section of the Opt-Out Capture or Opt-In Capture step. The agent's Consent tab shows the same status read-only.
The opt-in list
The opt-in list is a HubSpot contact list that the app keeps up to date as contacts opt in and out. A list the app creates is named RCS Opted-In — {agent name}, and it follows the agent's name when you rename the agent.
The app never creates it on its own. A new agent has no list, and recording an opt-in, a CSV import or a manual entry does not create one. In How you'll see consent, click Create new list, or pick an existing static list and click Link list. Only manual (static) lists can be linked; any other list shows "This list cannot be used. Only manual (static) contact lists are supported." Agents that already have a list keep it.
- Turning it off freezes the list. Click Turn off and confirm with Turn off list. The list stays in HubSpot and shows Turned off — not updating. The app stops adding and removing contacts, and changes made while it is off are not caught up when you click Turn on.
- If you delete the list in HubSpot while it is off, Turn on creates a new one. Turning it on later reuses the existing list rather than creating a duplicate.
- A HubSpot list that filters on RCS Consent — Opted In contains this agent is always accurate, even while the app's list is off.
- Changes you make by hand to the list are not read back. Adding or removing a contact on the list does not opt them in or out. Edit the contact's consent properties instead.
The RCS Consent card
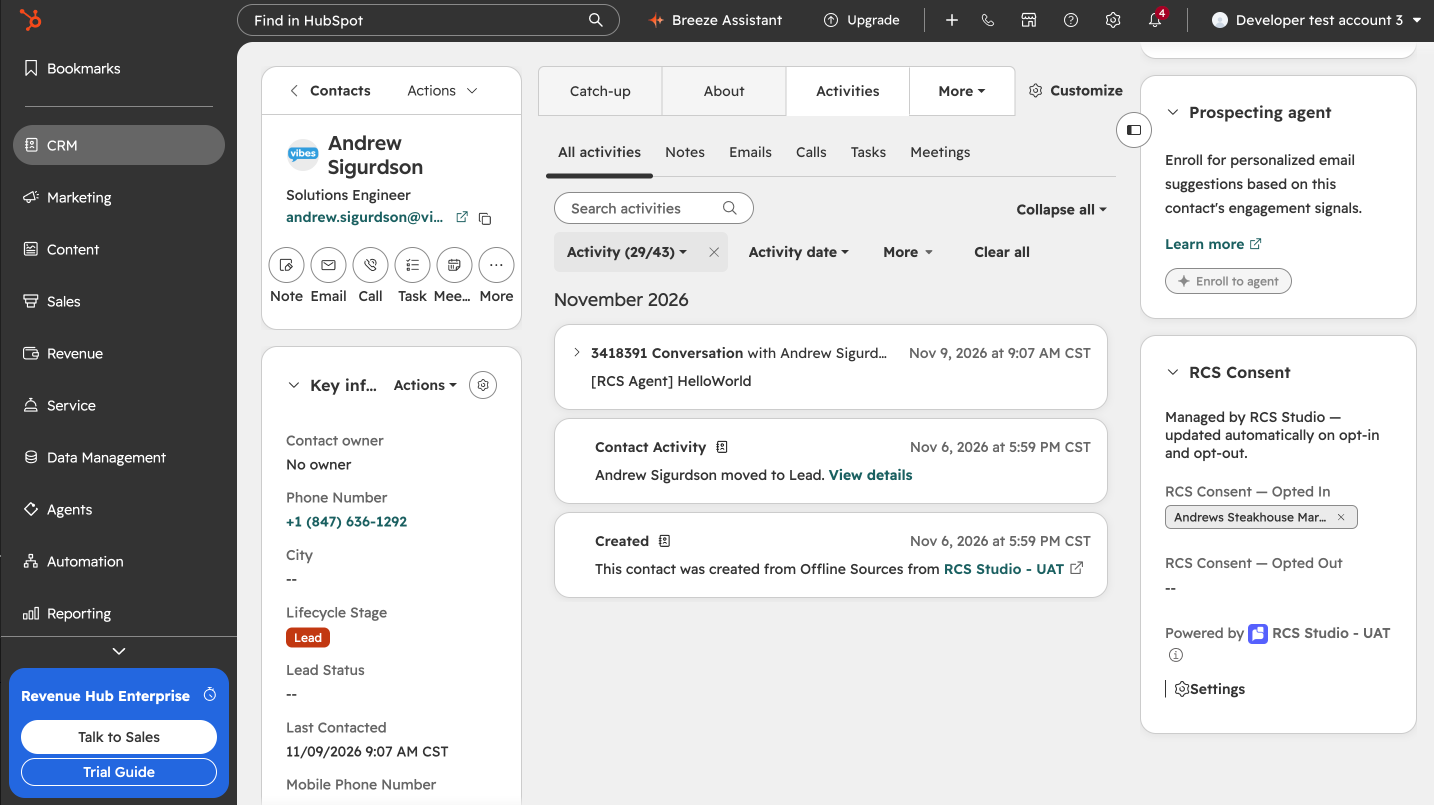
The RCS Consent card is a read-only card on the contact record. It shows the two consent properties, with the text "Managed by RCS Studio — updated automatically on opt-in and opt-out." HubSpot gives an app no way to place a card on a contact record, so an admin adds it once for the whole account.
Easiest way (super admins, when the app was installed from the HubSpot App Marketplace):
-
Click the settings icon in the top navigation bar.
-
Go to Integrations > Connected apps.
-
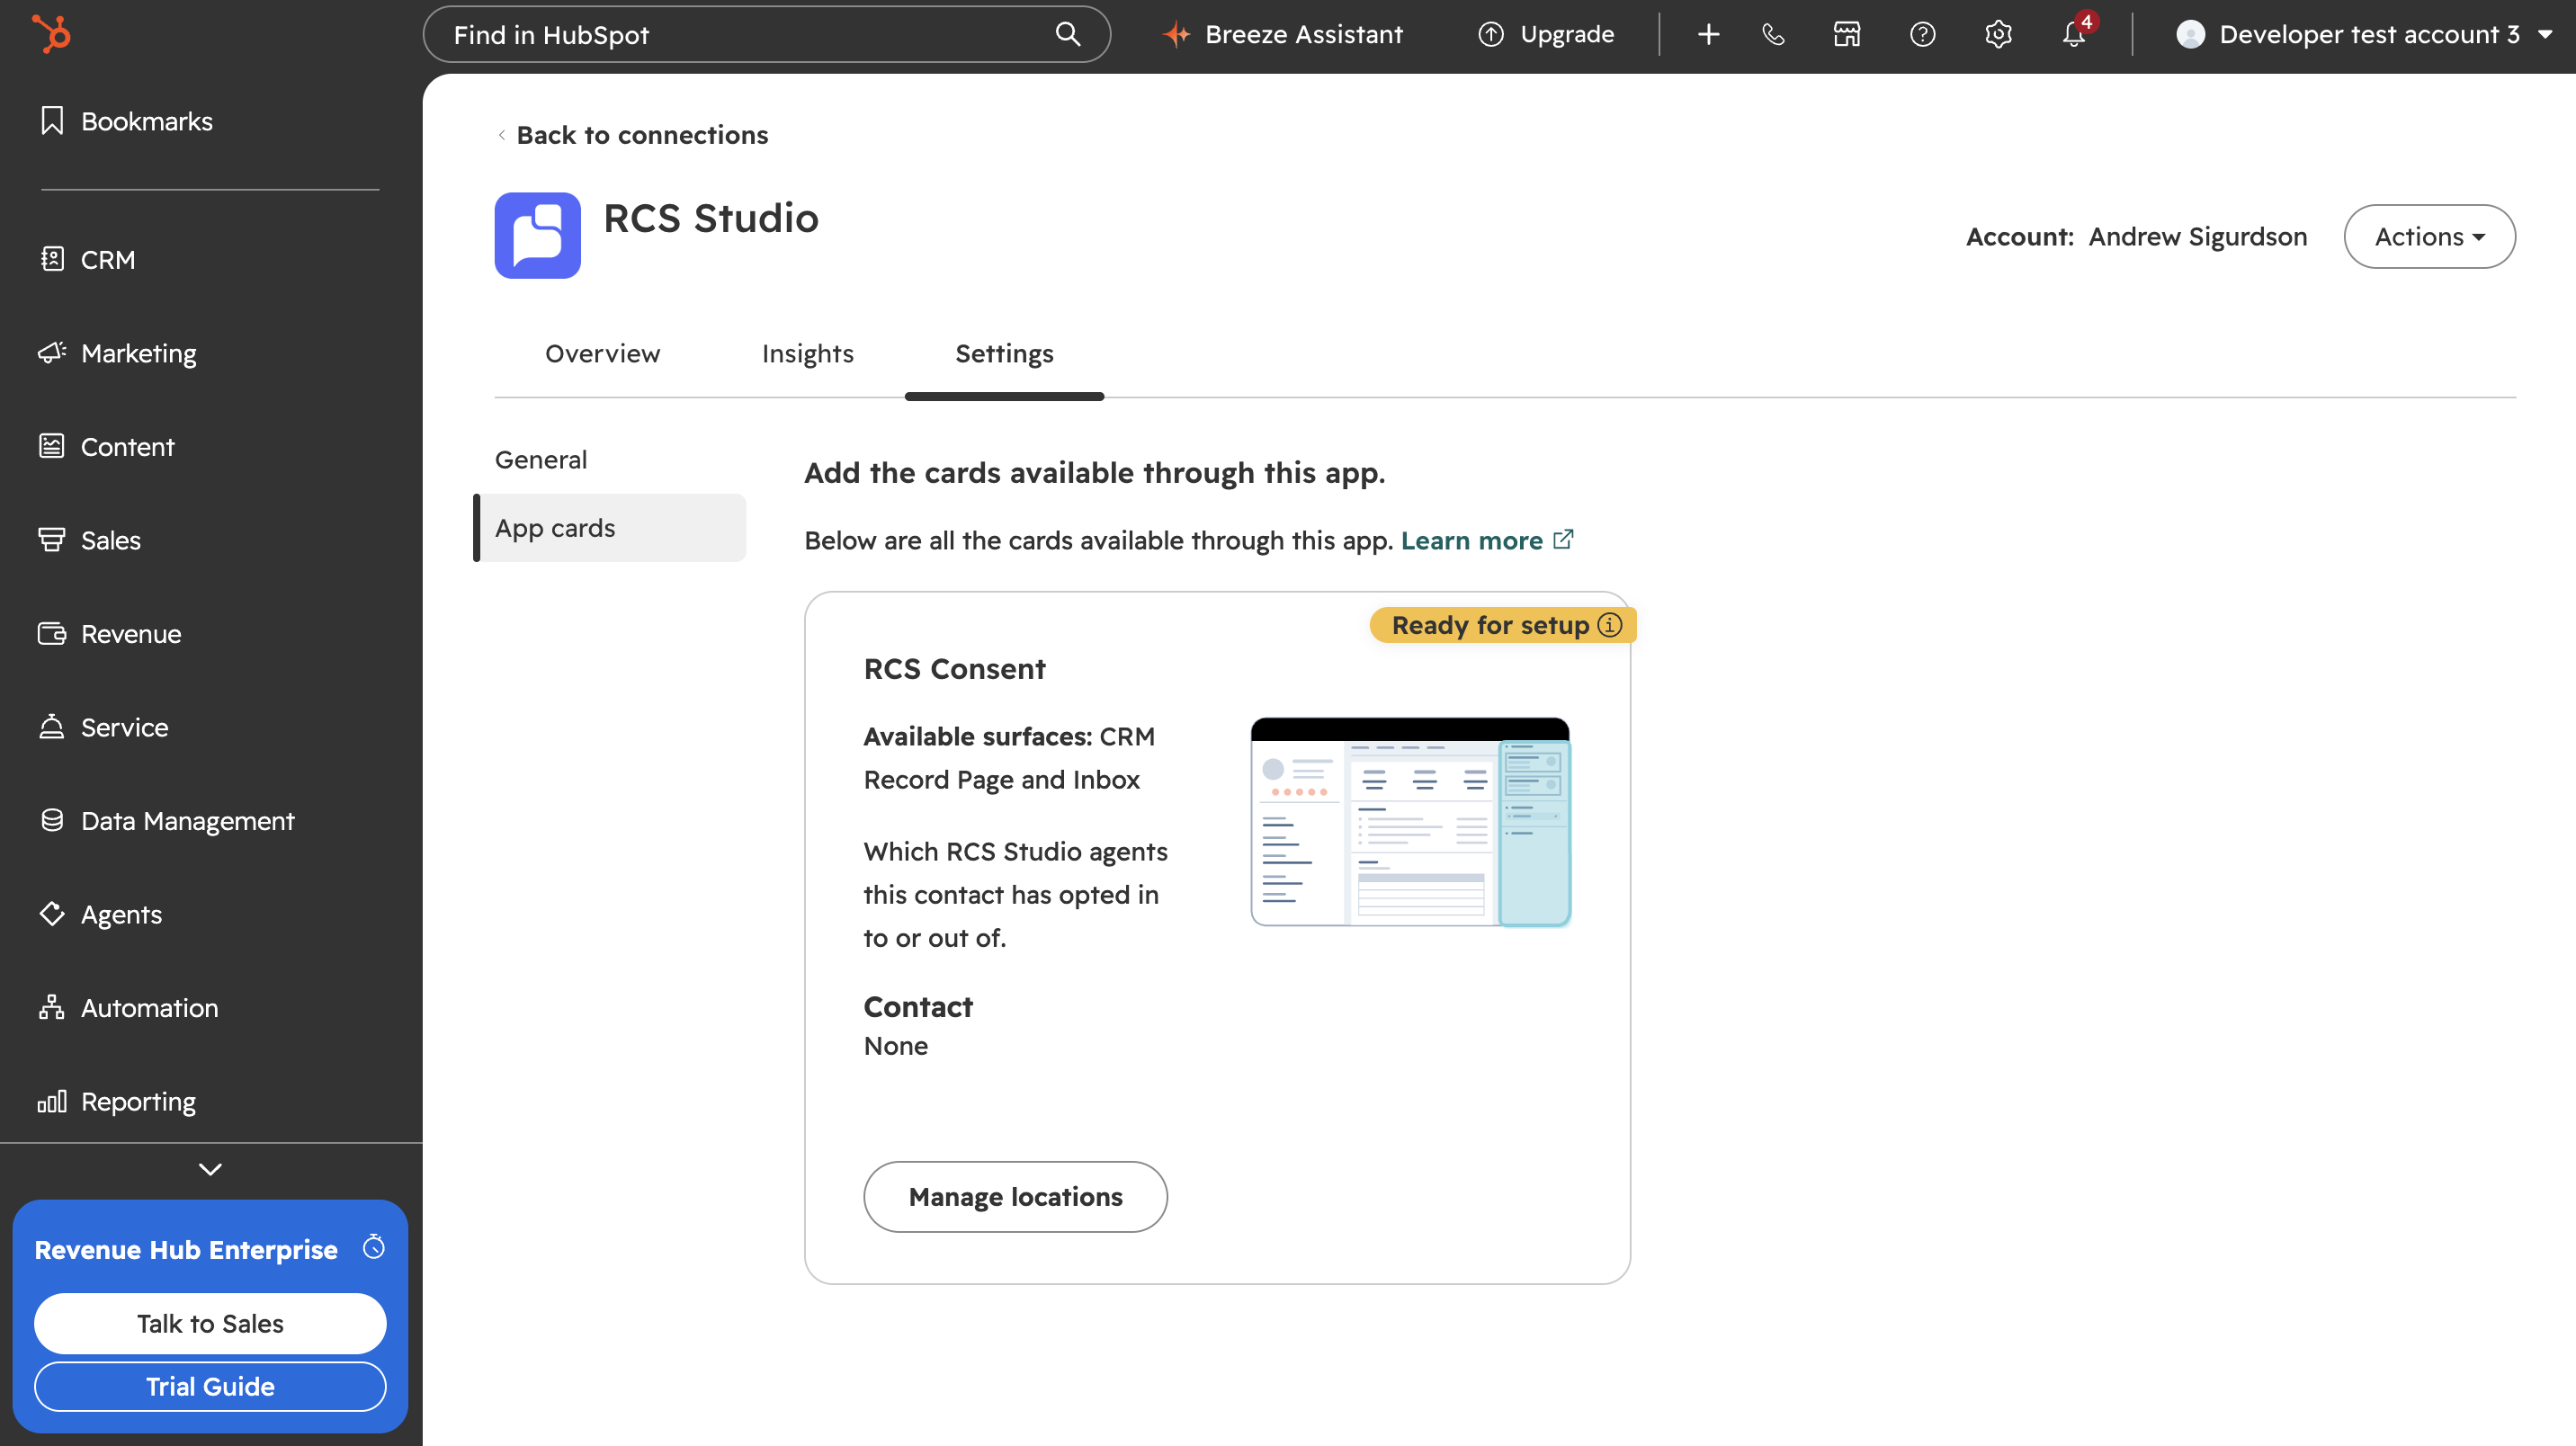
Under My Apps, select RCS Studio, then select the Settings tab and App cards. Open and navigate the app shows where.
-
On RCS Consent, click Manage locations.
-
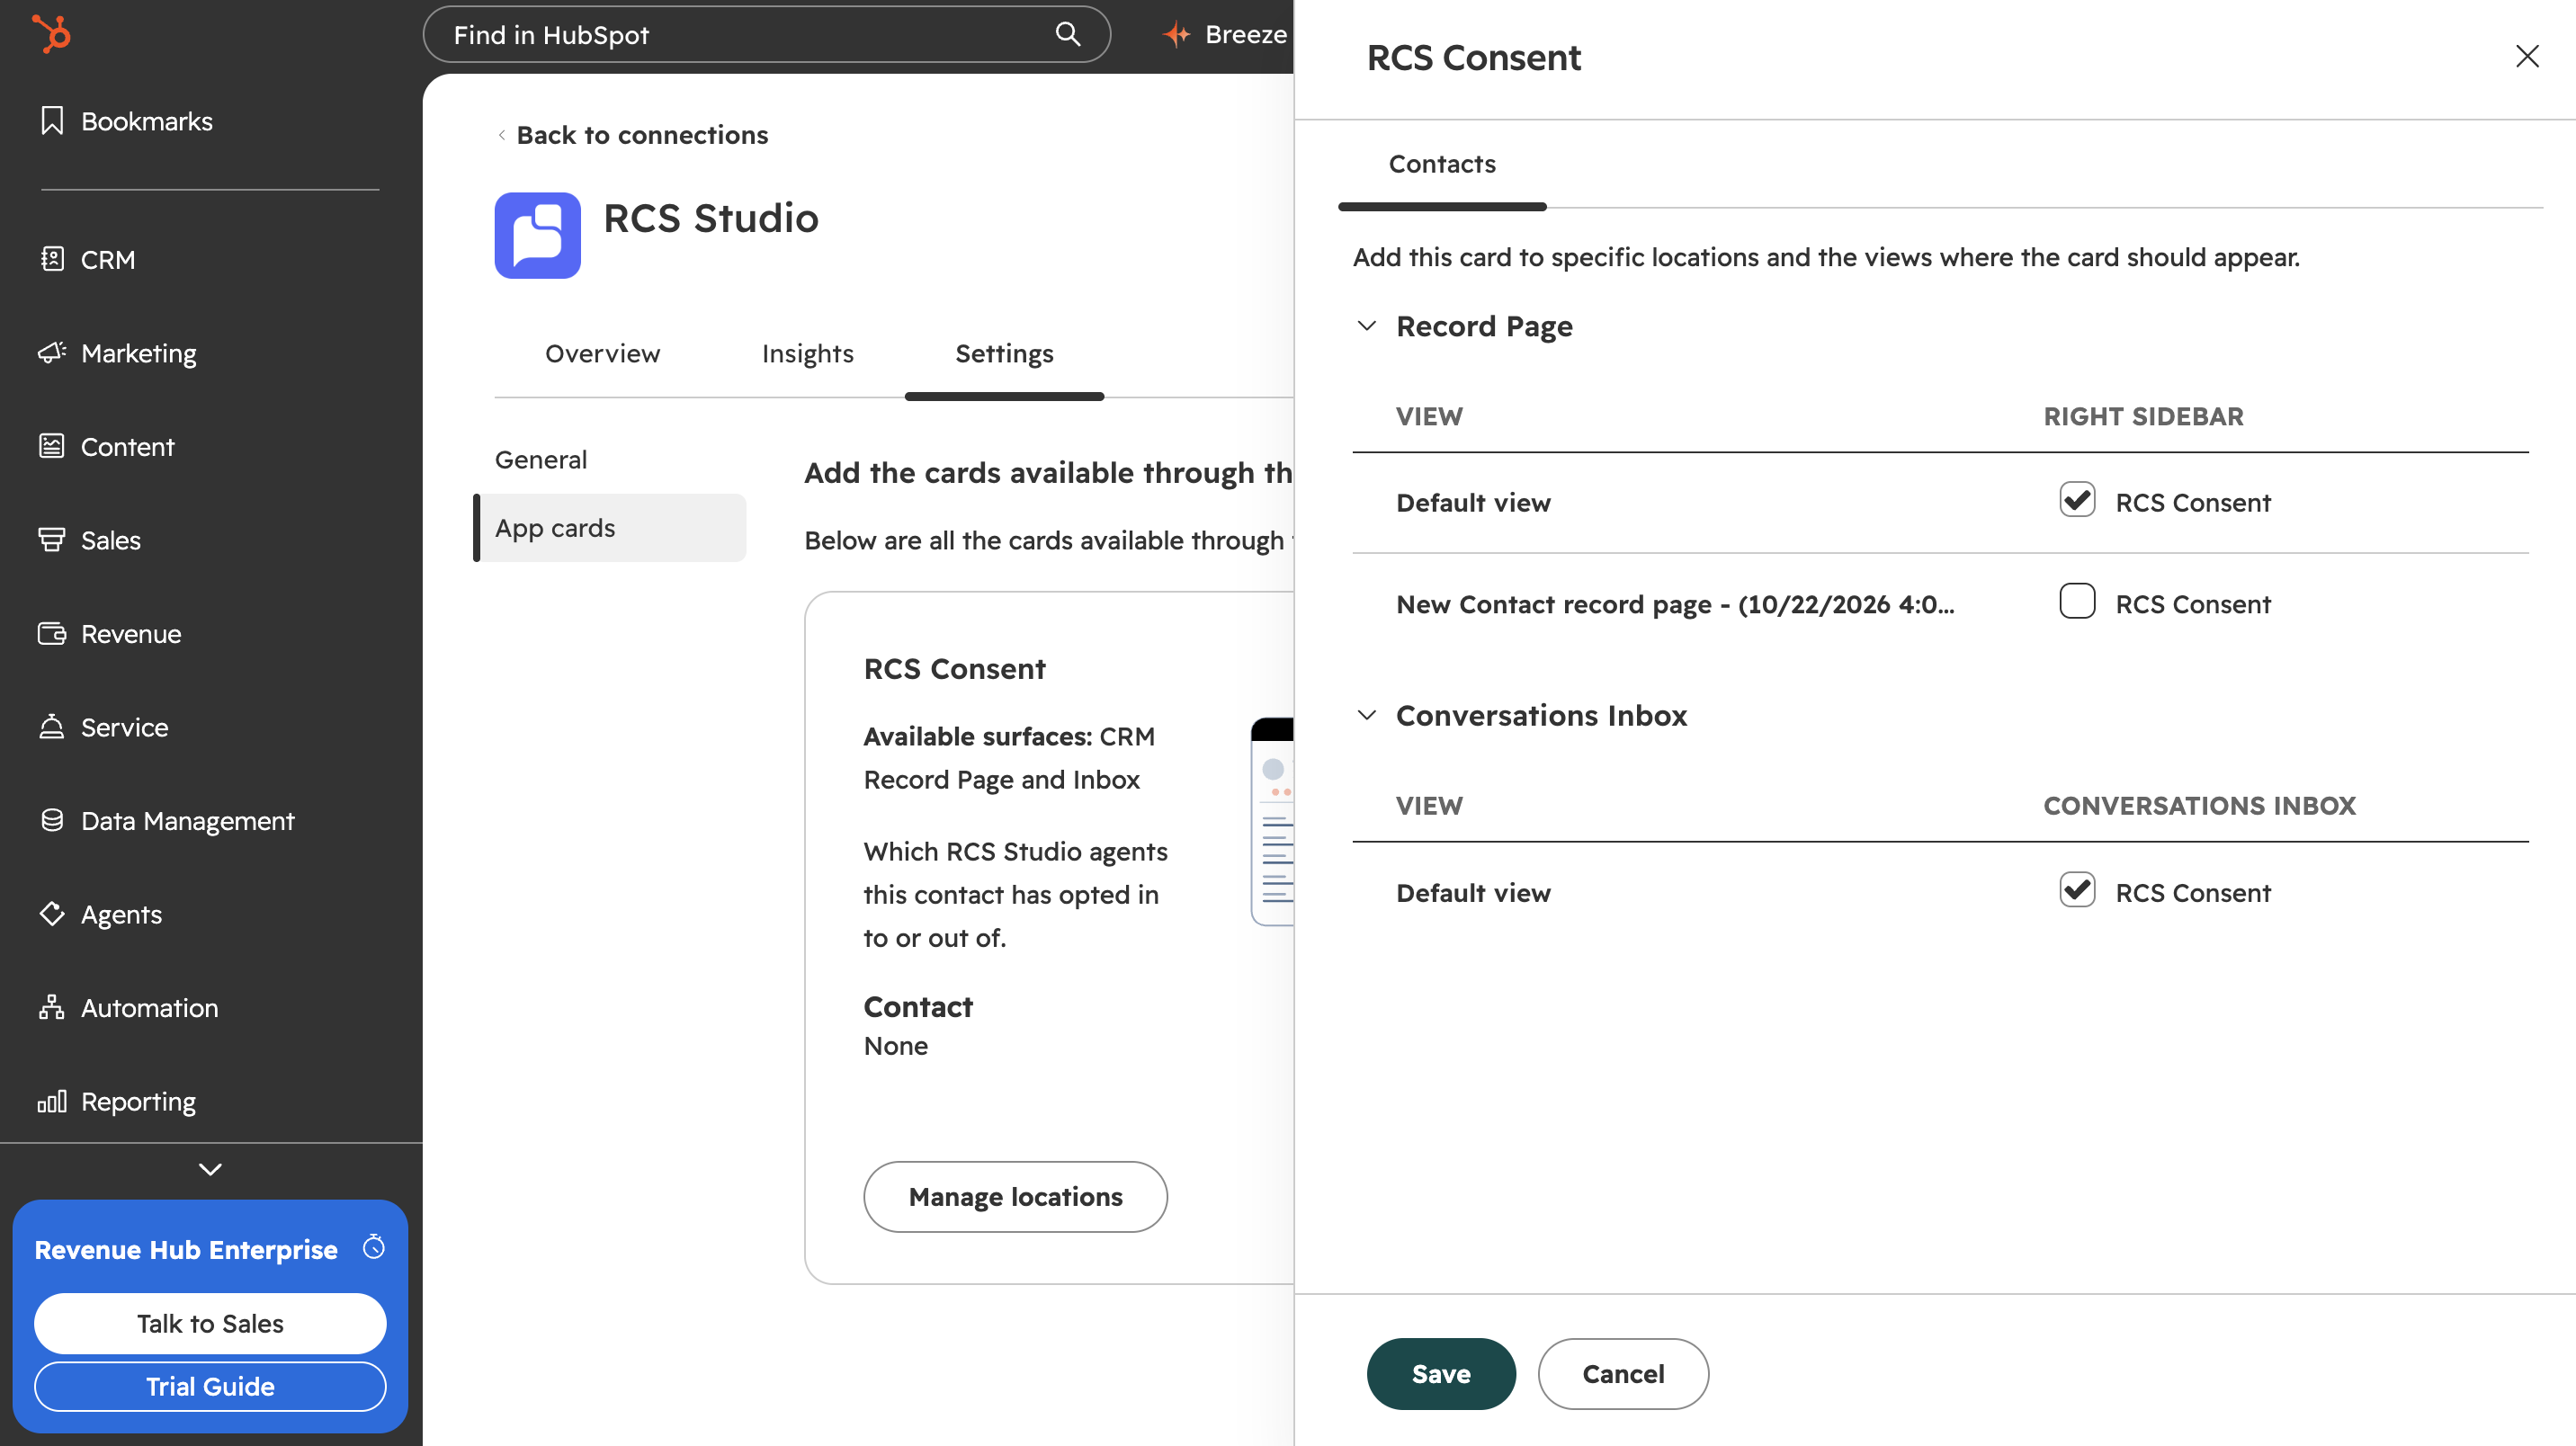
Under Contacts, check Default view (and any team views you use), then click Save.
If you don't see App cards under Settings, add the card from a contact record:
- Open any contact record.
- Click Customize at the top of the record, then Default view.
- In the right sidebar, click the + button.
- Click the Card library tab and search for "RCS Consent".
- Click Add card, then close the side panel.
- Click Save and exit.
If your team uses another view of the contact record, add the card to that view too.
Then click I've added it in the setup guide. RCS Studio cannot check that the card is on your contact view, so this is your own confirmation. The row then shows the date, and Undo takes it back. It applies to every agent in the account.
The timeline
Each consent change adds an RCS Consent Event to the contact's activity timeline, either Consent granted or Consent revoked, with the agent's name and How consent changed. The entries and their How values are listed on Collect future consent.
How consent is recorded
| Way | What happens | Page |
|---|---|---|
| A contact texts the agent | JOIN opts in, optionally after a confirmation prompt. STOP, other opt-out words, or Block (the block button in Google Messages) opt out | Collect future consent |
| A JOIN link or QR code | People tap the link or scan the code and are opted in | Collect future consent |
| A form or your own system | Your server calls the consent API | Collect future consent |
| You record it | Record Existing Consent on the agent's Consent tab, or Import CSV | Add your existing consent |
| Someone edits it in HubSpot | Changing the two properties counts as a consent change | Change consent in HubSpot |
How the setup guide helps you collect opt-ins
When you create an agent, the app builds system flows that handle opt-in, opt-out and help. You choose their wording and keywords in the setup guide on the agent's Overview tab, in the steps Opt-Out Capture, Opt-In Capture, Help Capture and Inbox. See Create and set up your agent. Only Opt-Out Capture and Opt-In Capture show How you'll see consent, the choice described above. The flow that answers texts no keyword matched is a system flow, not a step, and its main job is catching typed opt-outs first. Chat with agent is an optional button on the HELP reply and needs an inbox. The keywords, messages, JOIN link and consent API are on Collect future consent.
What consent means for your features
Workflows
The Send RCS Message action never sends to a contact who is not opted in to the agent. It skips them with SKIPPED_NO_CONSENT or SKIPPED_OPTED_OUT, based on the properties and not the opt-in list. How to avoid and branch on skips is covered in Send RCS messages from workflows.
The inbox
A conversation opens in the inbox only for an opted-in contact. When a contact taps Chat with agent and has not opted in, they are asked to opt in first, and the chat opens after they tap Yes, Subscribe.
An opt-out closes the contact's open thread for that agent, however the contact opted out. A reply to an opted-out contact is not delivered, and reopening a thread never opts the contact back in. See Two-way inbox for how a contact opts back in.
Test Mode
In Test Mode an agent reaches only devices that accepted the tester invite, so a send to an opted-in contact can look successful and never arrive. See Create and set up your agent.
Change consent in HubSpot
Consent is stored on the contact, so you can change it in HubSpot too. If someone edits RCS Consent — Opted In or RCS Consent — Opted Out (in the card, in View all properties, through a HubSpot import, a workflow or another integration), the app treats it as a real consent change:
- The timeline shows Consent granted or Consent revoked with How set to Edited in HubSpot.
- If the opt-in list is on, the list follows: an opt-in adds the contact and an opt-out removes them.
- An opt-out closes the contact's open inbox thread, the same as
STOP. - An opt-in on an agent in Test Mode registers the contact's number as a test device and sends the tester invite.
These side effects need the contact's phone number. A contact without one still gets the timeline entry and the list change. Edits are processed shortly after you make them. While a bulk import runs they wait and are processed after the import.
When edits conflict
The app reads the history of both properties and decides per agent:
- The newest change wins. An agent added to Opted In is an opt-in. An agent removed from Opted In, or added to Opted Out, is an opt-out.
- A tie is an opt-out. If one edit changed both properties at the same moment, the contact is opted out.
- Removing an agent from Opted Out alone does nothing. The contact stays opted out until you add the agent to Opted In.
- A later
STOPbeats a queued manual opt-in. If the contact textedSTOPafter your edit, the edit is dropped. A manual opt-out is always applied.
After a sync the agent is in exactly one of the two properties. Changes the app makes itself, such as a JOIN or STOP reply, the consent API, Record Existing Consent or Import CSV, are not counted twice.
Troubleshooting
| Symptom | Cause | Fix |
|---|---|---|
| A contact opted in but is not on the opt-in list | The phone number in HubSpot does not match the number that sent the keyword, or the list is off | Match the number, including the country code. Check that the list is on |
| A contact I added to the list is not opted in | List edits are not read back | Edit the contact's consent properties |
| Texting the opt-in keyword gets no reply | The agent's JOIN flow is off or the agent was not set up | Check the Opt-In Capture step in the setup guide |
| A contact in RCS Consent — Opted Out still gets messages | The workflow action skips them, so another sender, such as the API or an RCS Studio flow, is messaging them | Check what else sends to that contact |
| A contact's inbox thread closed on its own | They opted out | Check the timeline for a Consent revoked entry |
| I removed a contact from Opted Out and they still get no messages | Removing alone does nothing | Add the agent to Opted In |
| An edit did not stick | A newer change, or a STOP after the edit, won | Check the timeline for the later entry |
| An edit is slow to appear | A bulk import is running | It is processed after the import finishes |
| Two agents show similar checkboxes | Two agents have the same name | The later one carries the last six characters of its agent id in brackets. Rename an agent in its details to tell them apart |
| The step says Not set up | Neither the list nor the card is set up | Choose one in How you'll see consent, or ignore it: consent is still recorded |
| The list stopped updating | The list was turned off | Click Turn on |
Next
- Add your existing consent: record the consent you already hold.
- Collect future consent: keywords, the JOIN link and the consent API.
Updated 9 days ago