Create dynamic cards via API
Sometimes, the experiences you create may need to be dynamic based on time, place, or user inputs. Rather than updating the messages every time a small piece of data changes, you can utilize an API to retrieve data and dynamically populate it in your cards.
In this demo, we’ll show you how to:
- Set up a carousel of dynamic rich cards
- Use an native API to retrieve data
- Populate rich cards with data
For this example, we’ll be using the Amazon Location Place Search API, which is a library that has already been preloaded into your Data Connector Library.
Step 1: Collect the user’s location
In this demo, we’ll be using RCS Studio's Amazon Location Finder connector to search for the closest locations to the end user, which we will then display in carousel cards. With RCS, we can prompt the end user to share with us their current location, so that we’re also providing them with the closest locations to where they are now.
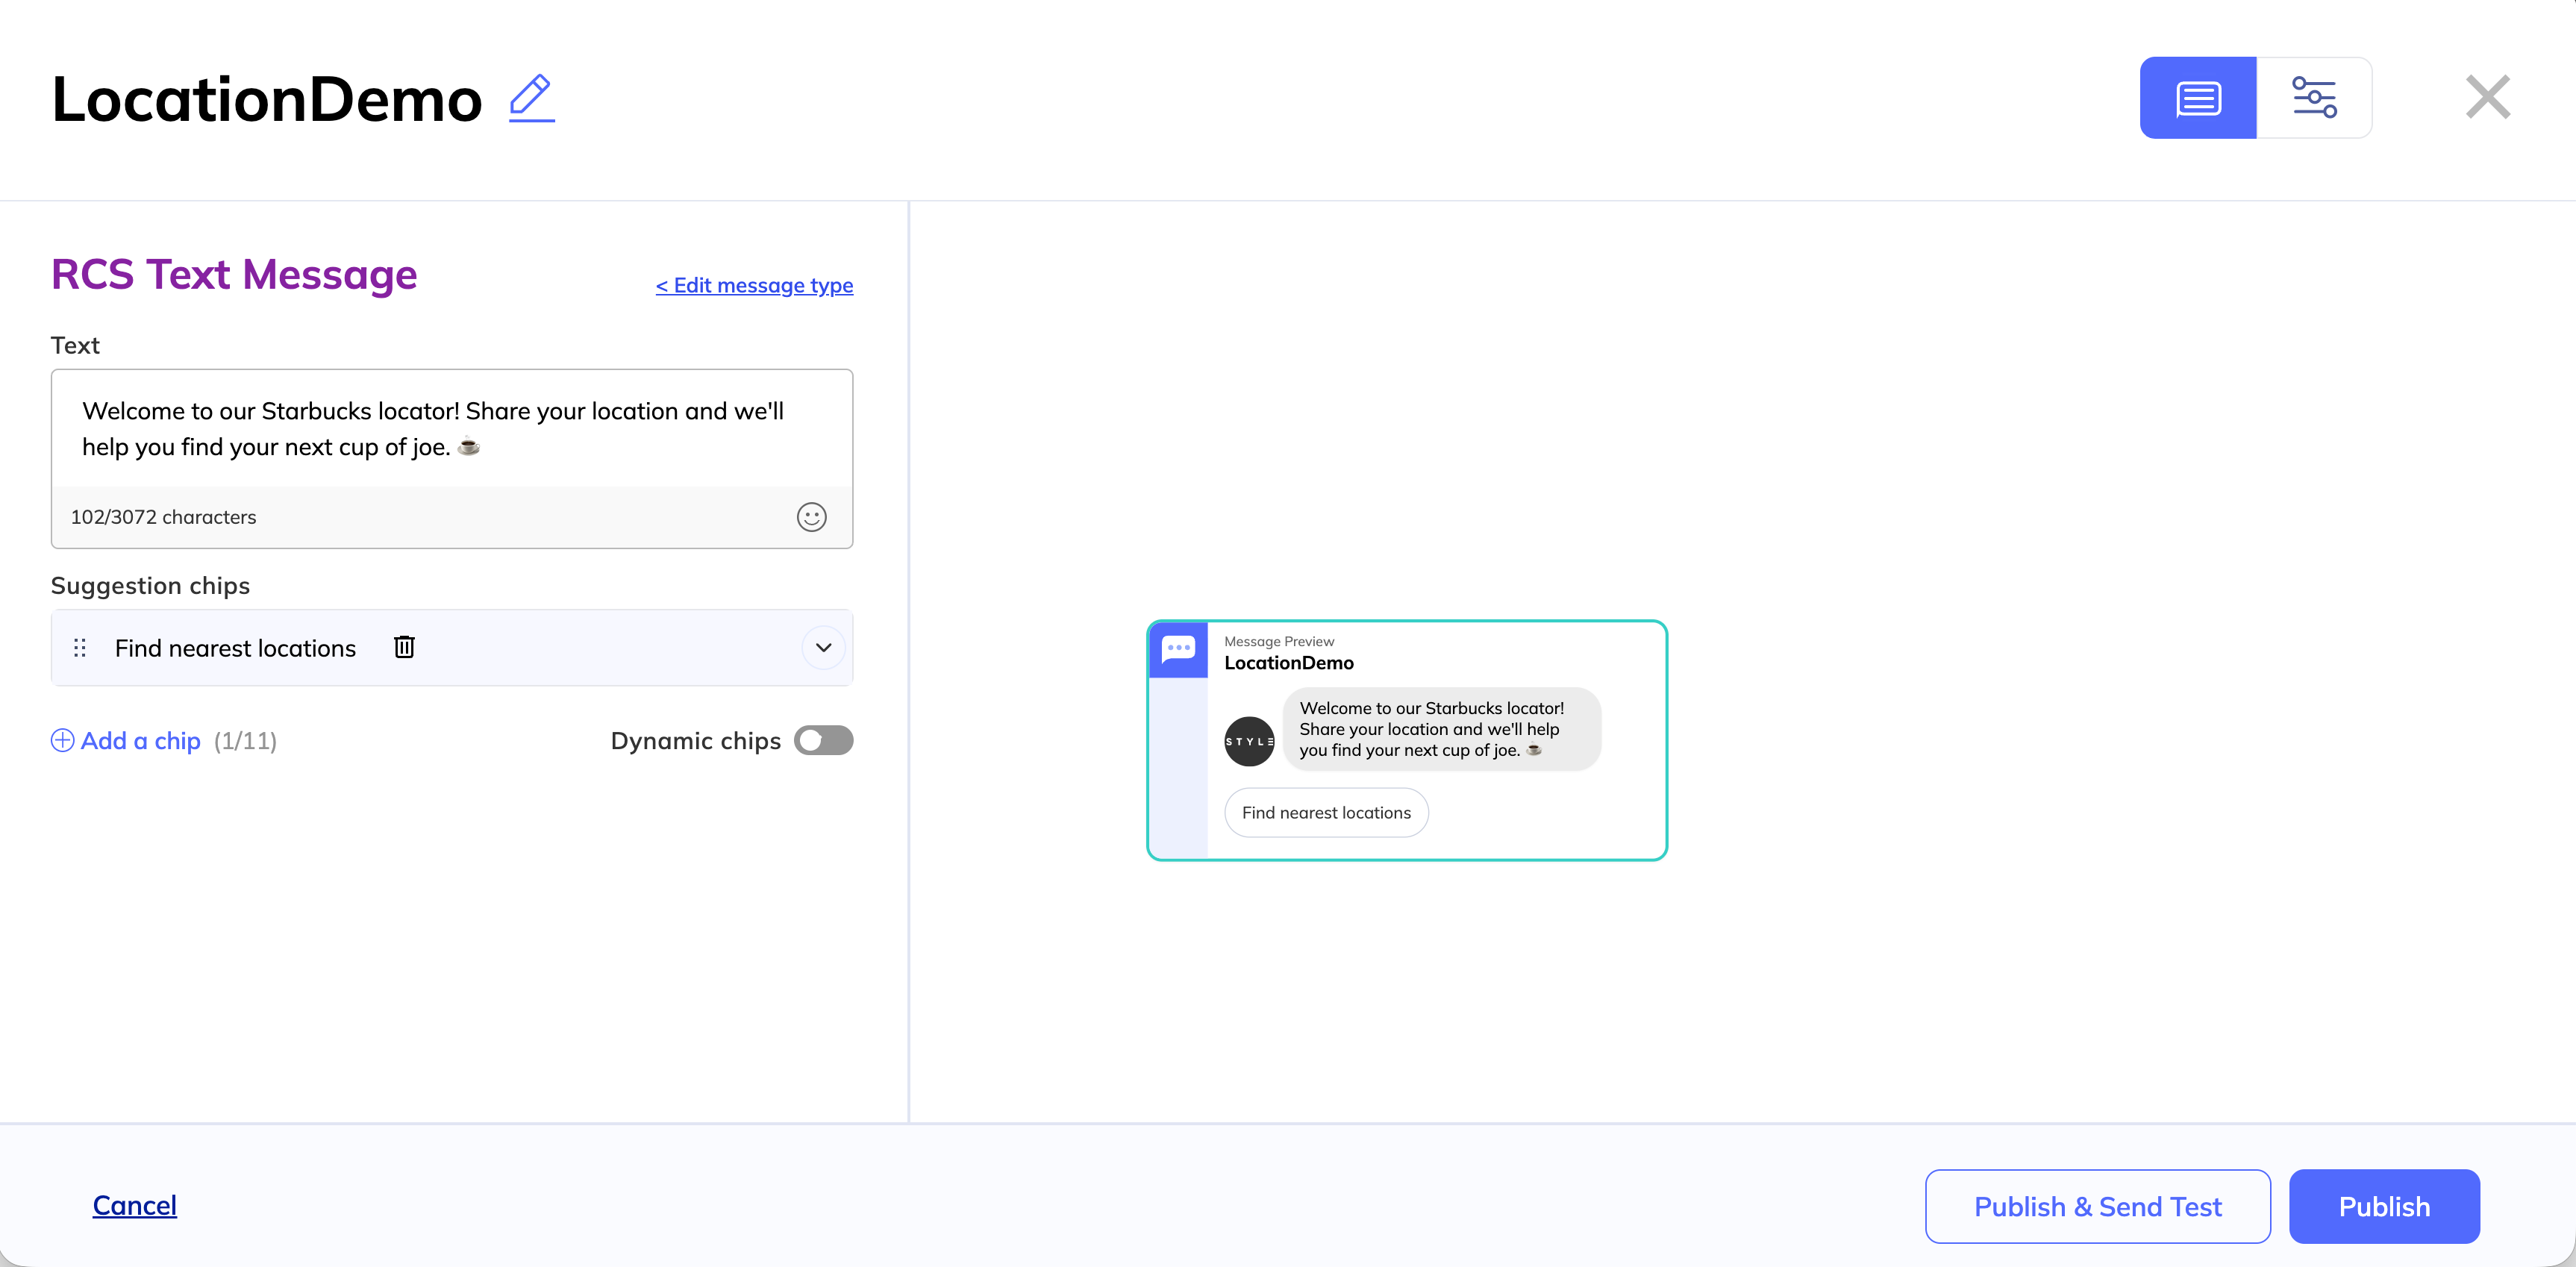
To start, pick any location you’d like to search for. We recommend using your favorite franchise. For this demo, we’ll use Starbucks.
In our first text, we’ll let the user know what we are doing and why we would like their location. Remember to give your view a memorable name so you can reference it later. We’ve called ours LocationDemo.
Under the Suggestion Chips, we'll prompt users to share their location with the tap of a button. Add a chip, and choose the action Share location.
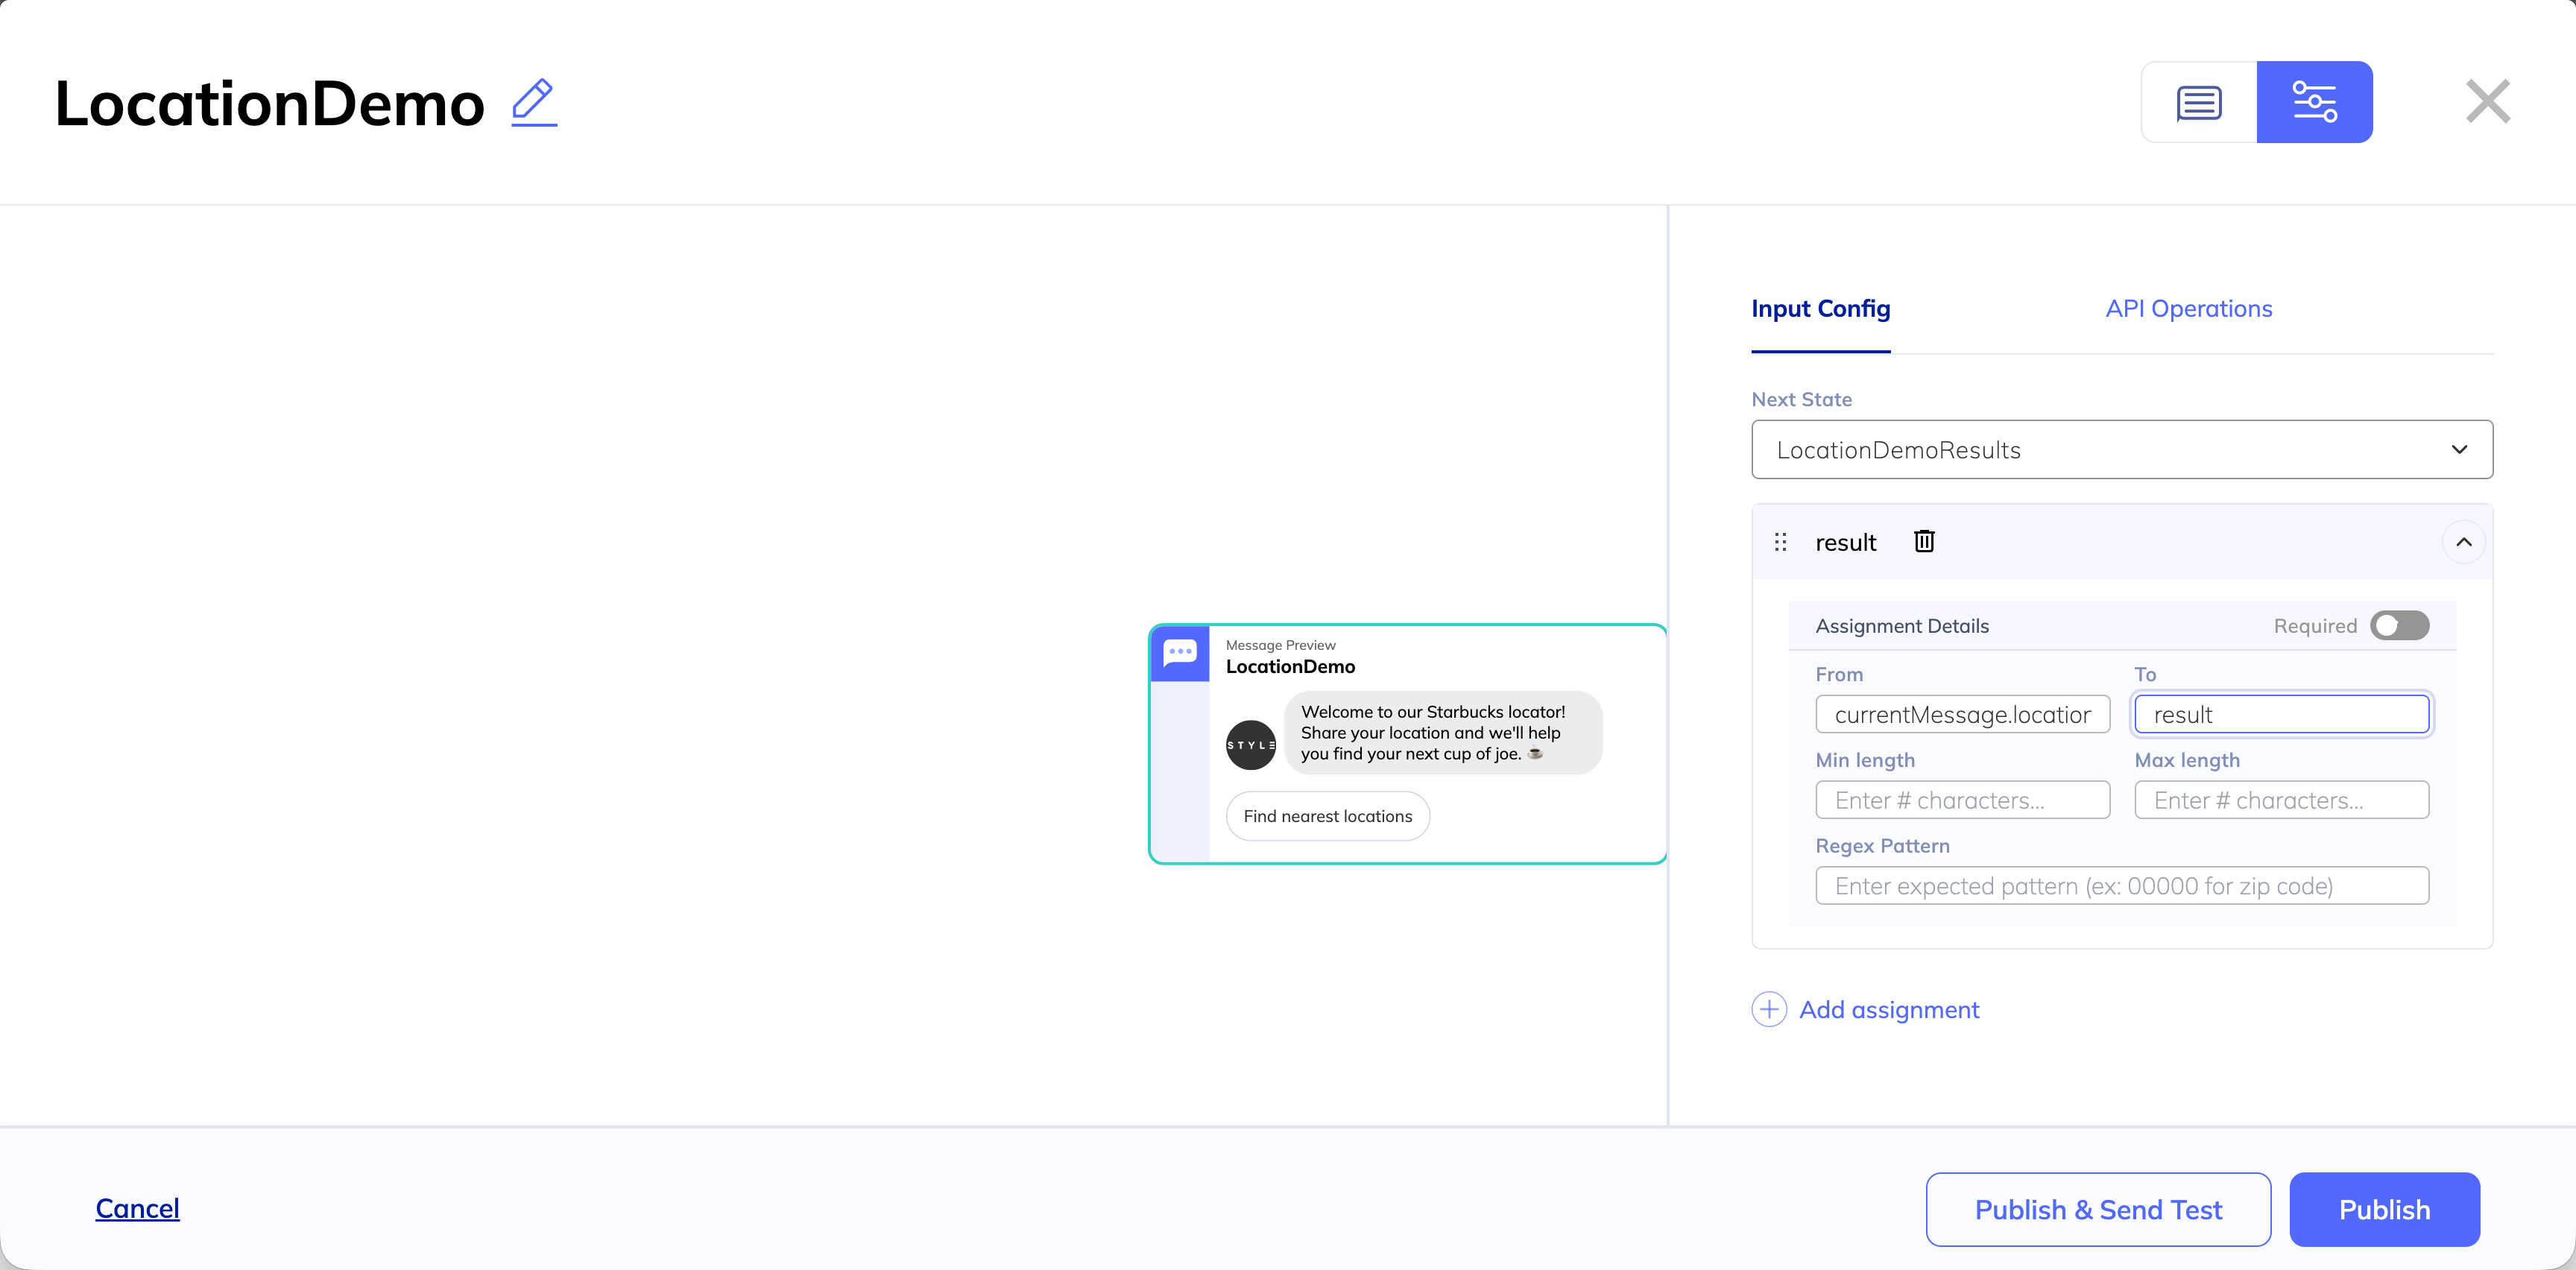
In the Advanced panel, we need to map this data to a field. Under the Input Config panel, add an assignment.
In the Next State, name the response we will be building in the next step. We’ll name ours LocationDemoResults. In the From field, add the token currentMessage.location to indicate that the system should be storing the location returned from the user. In the To field, map it to a memorable field. We’ll use result for our field name.
Step 2: Create a carousel of dynamic rich cards
Next, we’ll use the API response to create a carousel of dynamic rich cards, each for a different Starbucks location returned by our search.
To start, create a new view and give it the name you set the Next Step to in the previous message. In our case, we used LocationDemoResults.
Step 3: Build the API call
Next, we’ll add the API operation that calls the API and uses the user's location to search. To do this, go to the Advanced panel. Under the API Operations tab, add an operation.
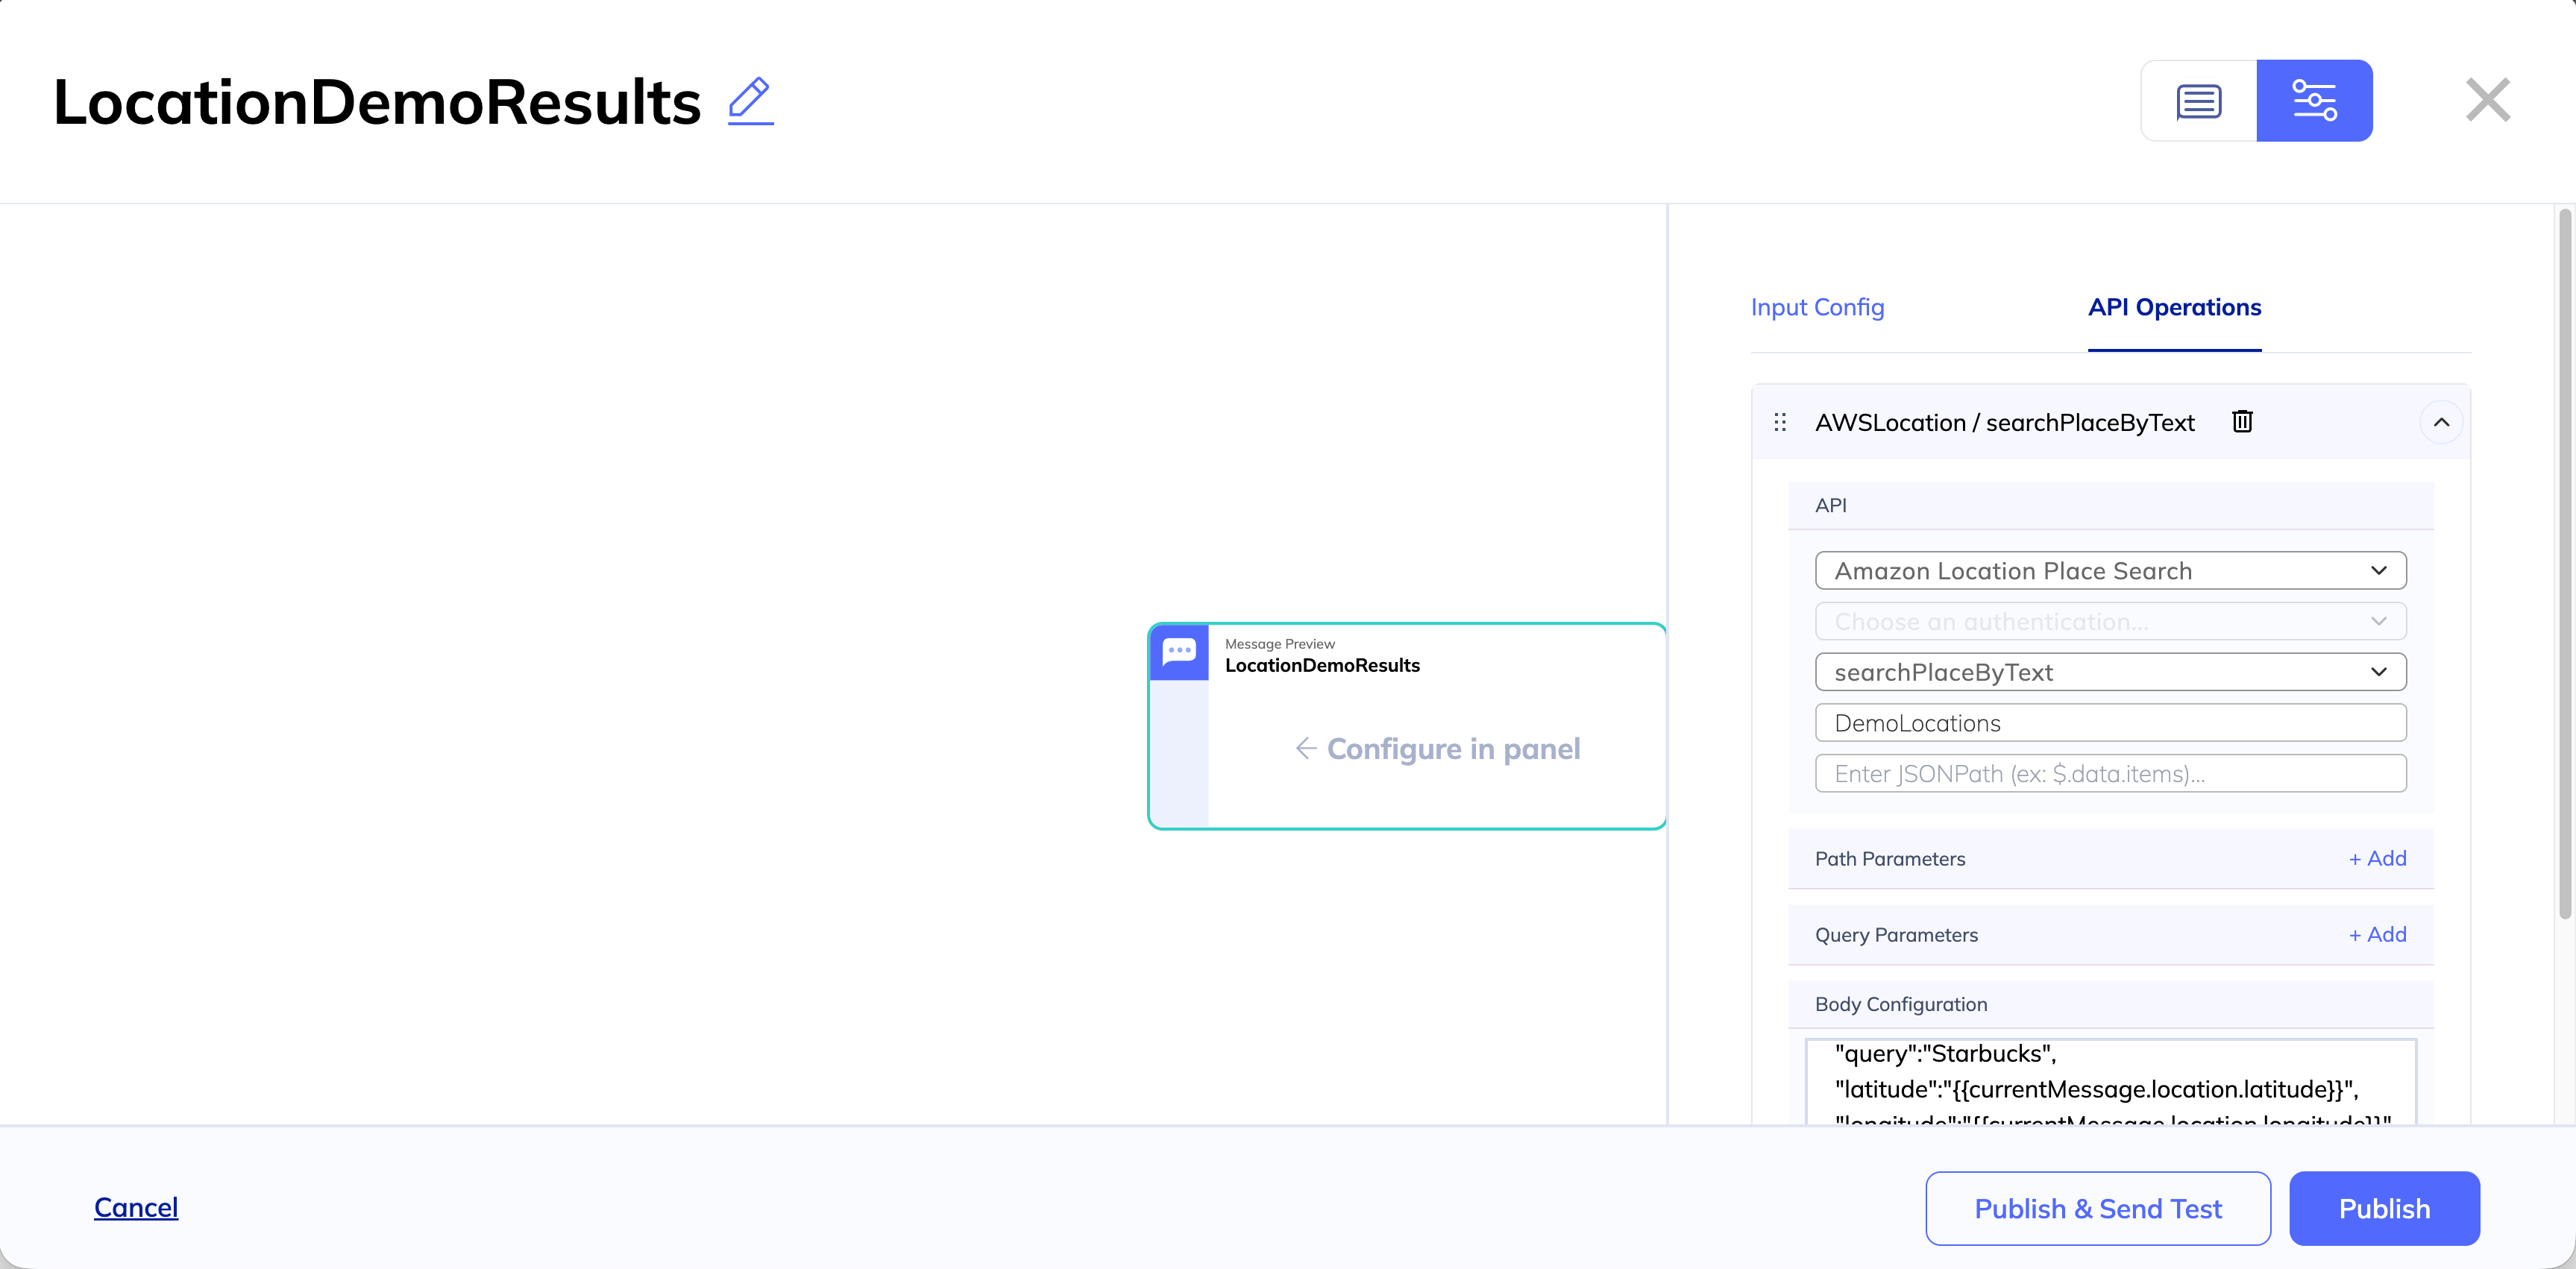
Choose the connector ID for the API you’ll be using. In this case, we are using an out-of-the-box library labeled Amazon Location Place Search.
You’ll notice that when you choose this API, the dropdown labeled Choose an authentication... is greyed out. That is because that API does not require authentication.
Under operations, choose searchPlaceByText. In the context key field, name the variable for your search results. In this case, we will use DemoLocations. Do not use a space.
Under Body Configuration, we'll add the body object of the API call. Here’s what it should look like:
{
  "indexName":"explore.place.Esri",
  "query":"Starbucks",
  "latitude":"{{currentMessage.location.latitude}}",
  "longitude":"{{currentMessage.location.longitude}}",
  "maxResults":5
}
In query, we’ve added a text-based search for Starbucks. You can put whatever franchise you’d like to put here.
Under maxResults, we’ve also predetermined how many cards we’d like in our carousel. You can have a minimum of 2 cards and a maximum of 10.
Step 4: Configure your dynamic cards
Next, we’ll build our carousel of rich cards. In the RCS configuration panel, add a carousel of rich cards. Instead of configuring the cards, scroll down to toggle on Dynamic cards.
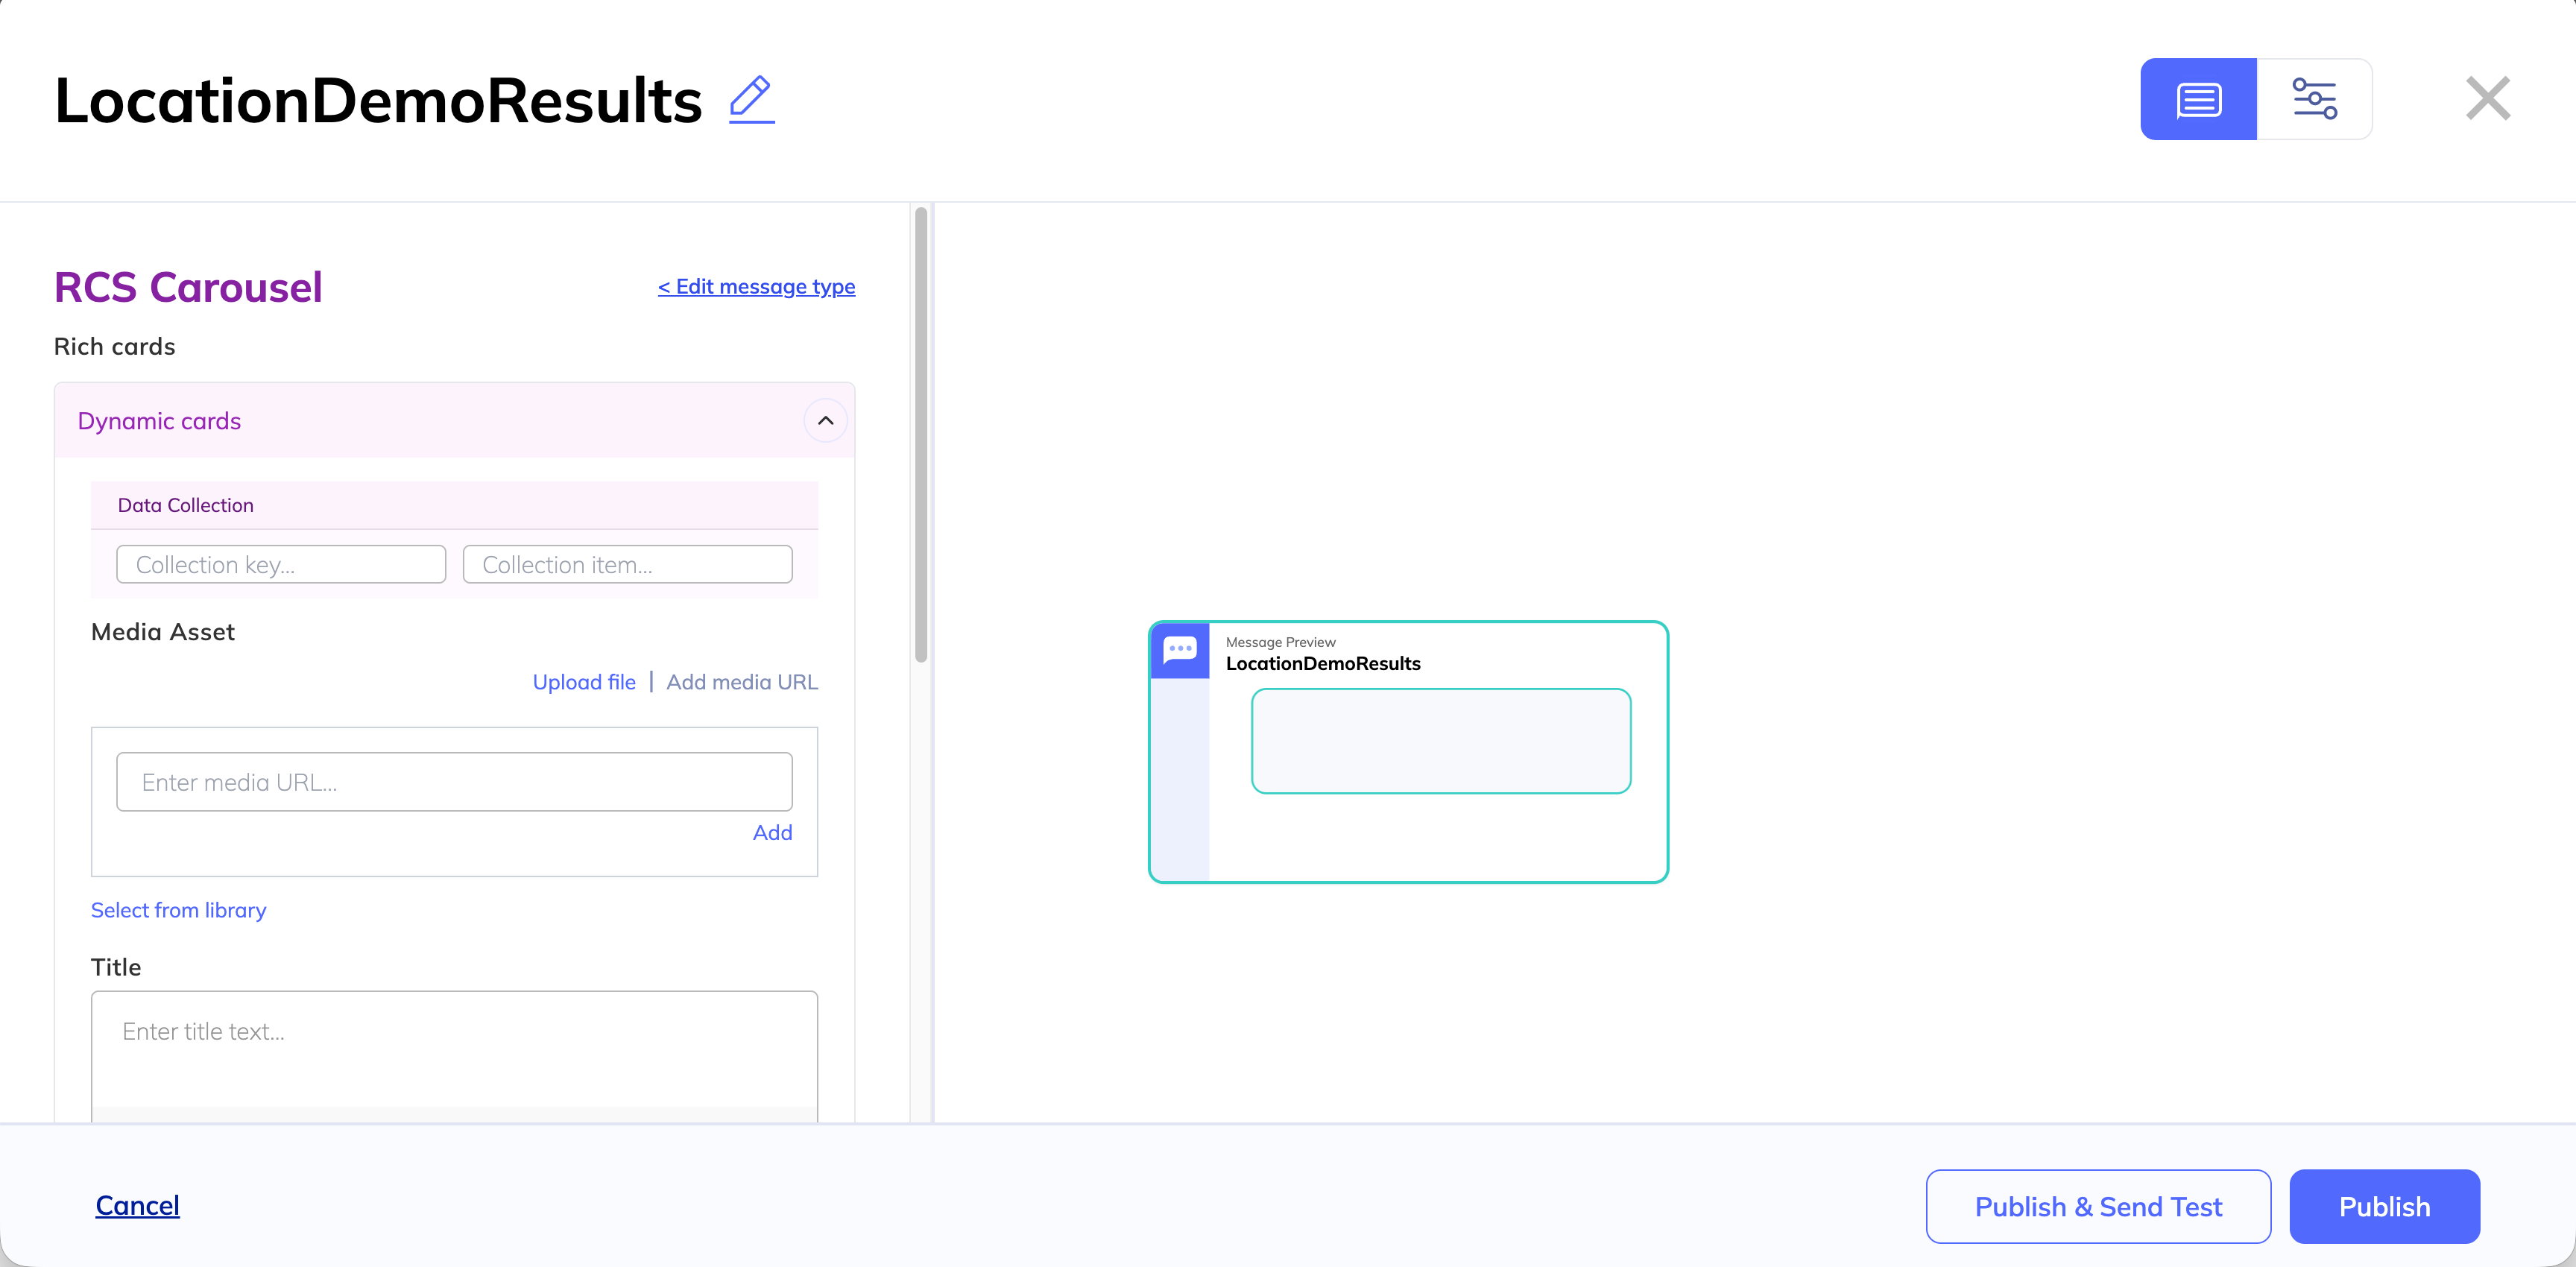
When you toggle the dynamic cards on, you should see a new field called Data Collection. In the Collection key, you want to reference the variable you named your search results. Remember, we named this field DemoLocations. However, we’ll need to add the prefix context.data to let the system know to reference the context of this conversation, and the data returned via an API call. So the variable should look like:
context.data.DemoLocations
In the Collection item field, you’ll create a new variable that you can reference as you build dynamic content. We’ll call our variable result. As you build your content, you’ll use this variable to refer to the body response returned by the API. You can see AWS Location Finder’s response syntax here.
In this case, we’ll use a few key parts of this result. In this demo, we'll use:
Place.MunicipalityPlace.LabelPlace.Geometry.Point
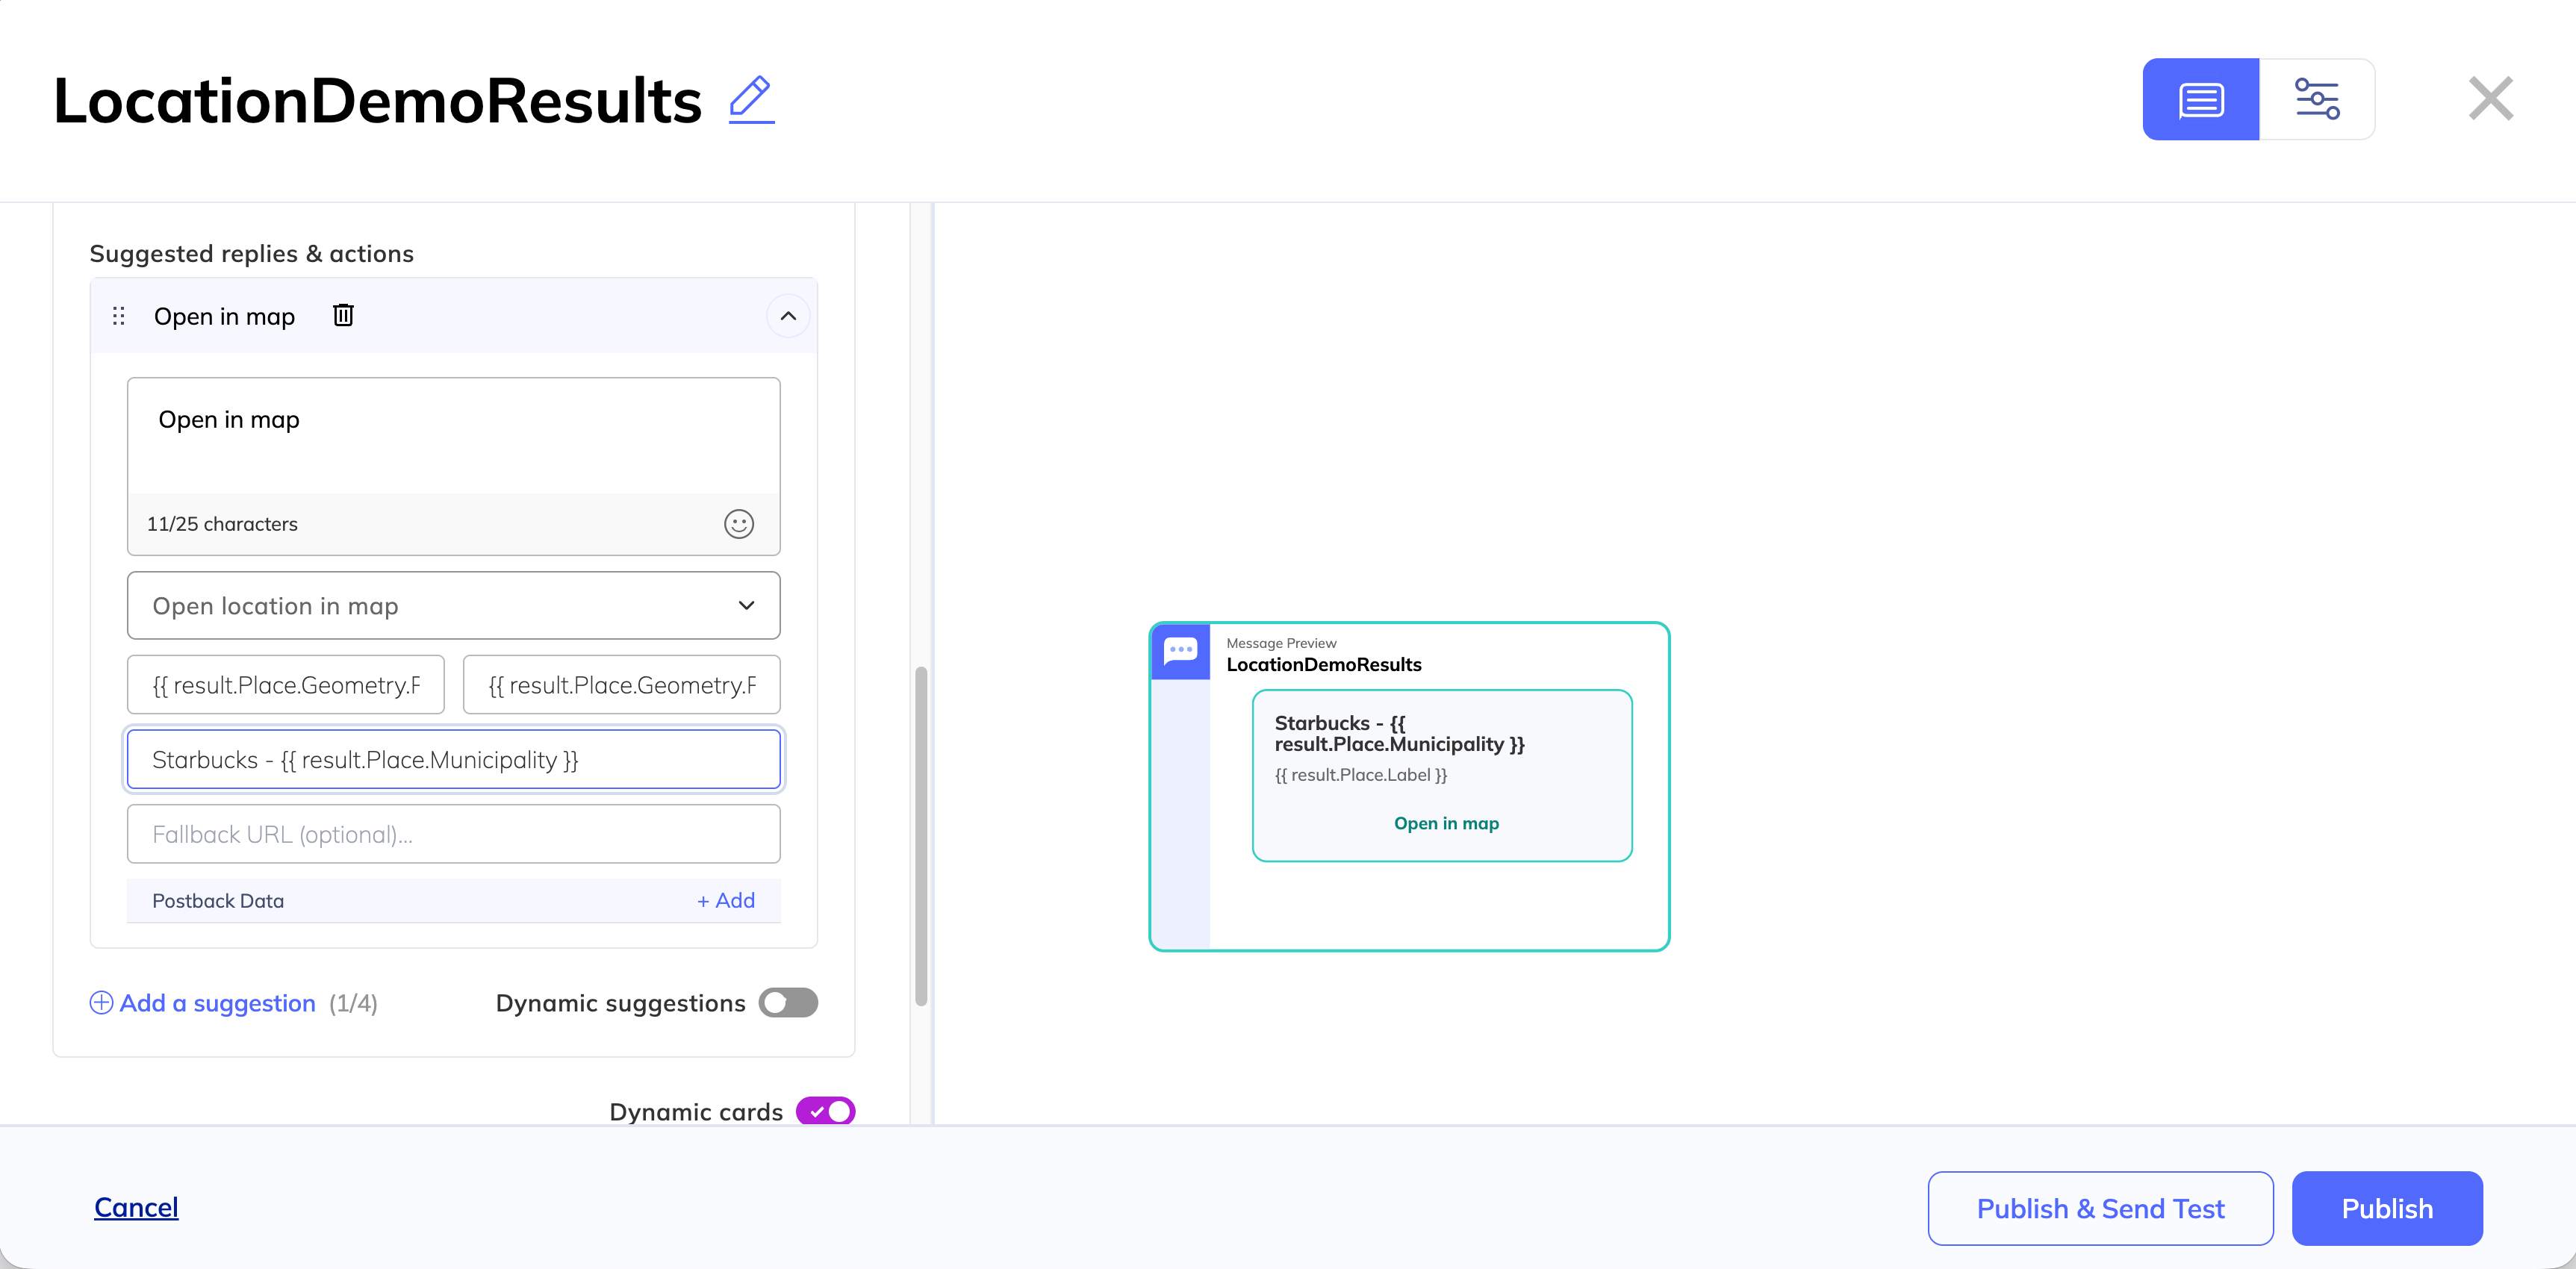
In the Title, we add the variable {{ result.Place.Municipality }} and the name of our franchise. Our content is as follows:
Starbucks -
{{ result.Place.Municipality }}
In the Description, we simply use:
{{ result.Place.Label }}
Under Suggested replies & actions, we want to give our users the ability to open the location in their native maps app. To do so, we add a suggested action for Open a location in map.
To open the location, we need the longitude and latitude of the result, so we add dynamic tokens. According to our AWS documentation, the Place.Geometry array returns longitude and latitude in an array, in that order. We can add [0] and [1] to our tokens to call on a specific result.
For Latitude, we add {{ result.Place.Geometry.Point[1] }} to call the second result.
For Longitude, we add {{ result.Place.Geometry.Point[0] }} to call the first result.
In the Label field, we can add a label for the map. We’ll use Starbucks - {{ result.Place.Municipality }}.
Publish your message.
Step 5: Test your location finder.
Now it’s time to test the flow. Go back to your first text message and select Publish & send test.
If you’ve already added your number as a test device, you can choose it from the dropdown and hit Send.
If you haven’t already added your device, you can add it now by choosing the Add test device(s) tab. Under add test devices, enter the phone number you’d like to send the message to in E.164 format. Do not forget the +1! Once the devices have been confirmed, check the box and hit Send.
Within a few minutes, you should receive your message on your device, allowing you to test the flow for yourself.
Updated 7 months ago